RoboRIO
What is a RoboRIO?
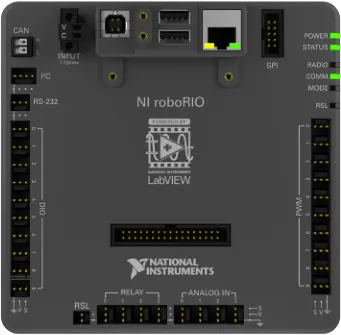
A roboRIO is the only FRC legal reconfigurable robotics controller that includes built-in ports for inter-integrated circuits (I2C), serial peripheral interfaces (SPI), RS232, USB, Ethernet, pulse width modulation (PWM), and relays to quickly connect the common sensors and actuators used in robotics. A RoboRIO includes built in LEDs, buttons, an onboard accelerometer, and a custom electronics port and is the central hub for all other external sensors, motors, or lights to be wired to.
Setting Up and Using WiFi:
Out of the box, a RoboRIO is not fully set up as it does NOT include a built-in WiFi module, a part that is essential to controlling your robot remotely. Note: It IS possible to run a RoboRIO with all functionality hardwiring to it over USB, you can deploy code and even enable the robot and have full motor and sensing functionality. However, you do need to have actual wireless connectivity to compete in an official FRC competition. To interface with the RoboRIO over WiFi, you need to wire an external WiFi router and then configure it by connecting to the RoboRIOs ethernet port and using the WPILibs router imaging tool to set the robots network name. Note: It is necessary to disable all other network adapters on your PC besides the ethernet adapter when doing this
What Should Be Wired to a RoboRIO?
The Power Distribution Panel (PDP), Pneumatics Control Module (PCM), Voltage Regulator Module (VRM), OpenMesh Radio, Robot signal light, motor controllers, 120A circuit breaker, WiFi radio, and battery connector are all parts that are needed to successfully and FRC legally wire a robot. However, not all of these are actually wired to the RoboRIO. The first step is to actually wire power to the RoboRIO and all that requires is to insert 10 and 20 amp fuses at the bottom of the PDP and then use 18 gauge wire to connect the “Vbat controller PWR” terminals on the PDP to the power input connector on the RoboRIO. For the WiFi radio, you need to first connect the radio to the 12V port on the VRM and then first connect a male to female ethernet adapter to the radio, and then a regular ethernet cable after that between the radio and the RoboRIO. For CAN wiring, simply connect one end of each wire to the CAN port on the RoboRIO and then the other ends to the correspondingly color coded ports on the PCM. For PWM devices, the most simple wiring method is to simply connect the PWM adapter to the motor controller (and if necessary PWM extension cables) and then connect the other end to one of the many PWM ports on the RoboRIO with the black wire facing out. For the signal light, first bridge the La and Lb terminals on the light, and then insert wire into the N(Negative) terminal and the Lb terminal and connect the two wires to the terminals corresponding positive and negative RSL port on the RoboRIO. Full Diagram
Formatting a RoboRIO Over USB
Every year, National Instruments releases a new addition of FRC Game Tools and it is also required to update your RoboRIO with the new firmware. The first step is to go to National Instruments website, and then downloading the software. After running the installer and letting all of the new programs download, open the RoboRIO Imaging Tool. Next, turn on the robot whose firmware you want to update and then using an I2C cable plug into the I2C port on the RoboRIO. Once the target is seen on the PC, click on the proper firmware to be deployed. (The RoboRIO 2 came out in 2021 with twice the RAM as the original), and then click Reformat. Note: If you are having continued failure with deploying the firmware, ensure that there is not a dash in your PC’s name.
Formatting a RoboRIO Over SD
Recently, there have been some issues updating firmware or reformatting a RoboRIO 2 over USB. However, there is another way to do this by reformatting the RoboRIOs micro SD card. To do this, first turn off your roboRIO and then pull out its micro SD card by pushing down on it with your finger nail or a small flat head screwdriver. Next, plug the micro SD card into your computer (over a USB adapter). Now on your computer, open up the roboRIO formatting tool. If you do not already have it installed, you can download it here. You will also need balenaEtcher or someother application that can flash firmware on to microSD cards. Now open it up and click on the SD icon in the bottom right area. This will open up a file explorer window where firmware versions are stored. I would recommend moving the SD image which is found in the SD images folder onto your desktop. In balenaEtcher, click flash from file, open up the image you got from the roboRIO image, then click select target and click on the microSD you got from the roboRIO, and then flash. Once its done, you can eject the drive and plug it back into the roboRIO and power it on. Note: It is necessary to set the team number from the software otherwise you will need to use the team number “0000” in your driver station and WPILib extension in VSCode. It is highly recommended to change the number.
Setting Team Number
To change the team number of a roboRIO, first turn it on and connect it to your computer via a USB B cable. Now open up the roboRIO imaging software and click on the Team Number box and enter your number. Now click on Edit Startup Settings and then you can enter your team number in the box above it. Now when you hit apply it will reset the roboRIOs team number. It is important to use the correct number otherwise your driverstation will be unable to connect and you won’t be able to deploy code from VSCode. Note: If you are changing a team number other than the default, 0000, the first time you try to change it it will only change the roboRIOs team number to 0000. You will need to apply the change a second time in order for a new number to take effect.